At this lesson let’s make something that can bring us some money for our livelihood. Because we will still have to learn for a rather long time… The first thing that comes to my mind is to make souvenirs. And a fridge magnet is the easiest thing to do from clay. Of course besides clay we will need the magnet itself that we will glue to a burned piece of clay, but it’s another thing to do. The main thing now is to think up the theme. You can follow the trodden path and depict any place of interest of your city on your clay 9you can use any picture for this). But you can approach this task creatively…
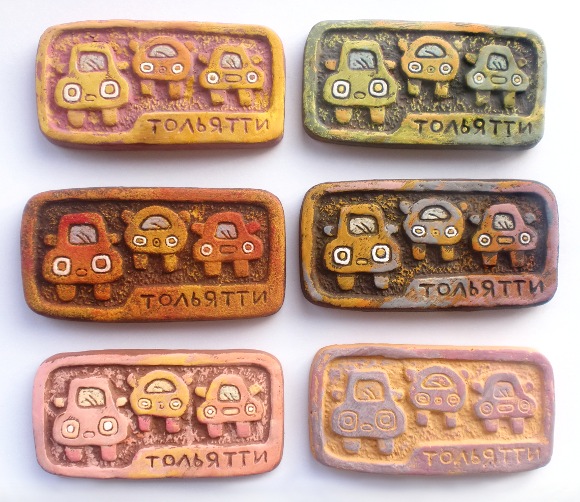
Our glorious city Togliatti primarily is famous for its cars. So they will be depicted on our fridge magnet; but we will draw cartoon cars, not real ones.
To start with let’s draw a draft (even better to draw several drafts to have more options to choose from).

Let’s start making the magnet. Make a tablet of the needed size (5-6 mm thick) from clay or playdough. And mark contours of the future relief.


That will be our background; remove a small layer. You can do it with a flat stick or a metal plate.

You can add texture to the background to make it differ from the top layer. You can do it with a pen or a knitting pin.

Now you only need to engrave letters, even the contours a little bit and our template is ready.
Now we need to make a mould to make copies of this template. We will use plaster (gypsum) for this purpose. To start with you need to place a template on a flat water-resistant surface, for example, made of glass, and glue cardboard tape about 2 cm high around it.

When the glue is dry stir plaster till it’s like a liquid sour cream; then pour it into our mould.

Carefully slide your finger across the template without damaging it. Thus the plaster will be able to fill hard-to-reach areas.

Slightly bang the table with fist a little to remove air bubbles.

Now you need to wait a little till the plaster is set. Then remove the cardboard tape.

Polish the edges; remove those that are sharp.

Now you can remove the template out of the mould. It’s most likely that you won’t be able to keep it, so it’s easier to remove it by breaking small pieces off it.

Now with a sharp wooden stick clean the mould and leave it for a while to let it dry.
Now you can start making casts. Press homogenous and well kneaded clay into our plaster mould in small pieces.

Even out the surface with a ruler.

Now it is the most crucial moment. With another piece of clay take out our cast very carefully.

It is ready!

Now you need to burn the magnet and paint it, but we will talk about it in the next episodes)
To be continued…
Tags: Clay molding, Magnet Categories: Lessons