The main question for a ceramist beginner is not “where to get clay”, as you can find it anywhere and not “how to make a pottery wheel using the washing machine”, as you can mold without the wheel. The main question is “where to fire?” To fire a ceramic article you will need a special pottery furnace that heats articles until 1000°С (1830⁰F) temperature.

Surely you can buy a ready-made kiln if you can afford it. Or you can make it yourself. In this lesson we will see how to make a homemade pottery kiln to fire ceramics with capacity about 30 liters and that operates on a plug that supplies 220 volts.
 There are two types of electric kilns: muffle and chamber kilns. The muffle kiln has its heating elements around the muffle – a one-piece container made from a fireproof material. Our schools in Russia are equipped with such kilns.
The chamber kiln has its heating elements inside. This type is more preferable for us as we don’t want to make a small kiln; but to mold a large and durable muffle is quite difficult. Besides the muffle kiln loses heat much faster than the chamber one does.
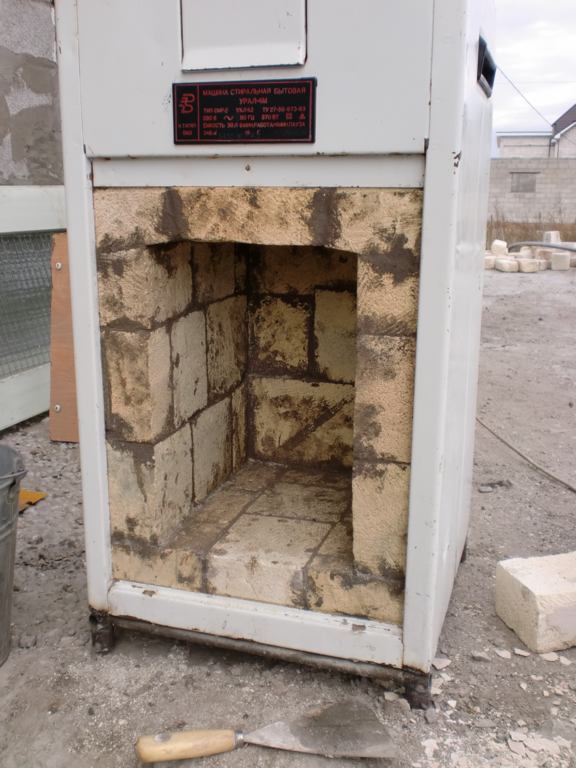
So, let’s begin. First, we need to find a body for our future kiln. For this it is enough to look around. We have found a washing machine like this, better to say what was left over from it.


If you are in a desolate region and no one throws away their old washing machine and refrigerators then you can buy a galvanized sheet and make the body from it. The dimensions of the body: about 0,5m – width; 0,5m – length; a bit less than 1 m – height.
So we have a metal box, now we need to strengthen the bottom of our future kiln. For this purpose the best thing is to use L-steel. We did not have it so we welded a pipe about 15mm in diameter. Then weld pieces of the pipe in diameter a little bigger in the corners – they will be the legs of the kiln.

Also we will need to strengthen the top of the body, a door and at least one edge to which the door hinges will be welded.

Put a layer of basaltic continuous fiber about 10-20 mm wide on the bottom. (You will need to put the same layer on the walls). Lay several pieces of a square pipe or L-steel so that fiber would not get crumpled under the weight of the chamber. Then cover the fiber with the metal sheet.


Now we need to decide about fire proof materials from which we will make our chamber. A good option is refractory fiber. You can order it as big as you need or cut it at home. You will need six plates of such refractory fiber.

In Togliatti we have a company “Refractory fiber”. They can make such plates of refractory fiber. But the price is quite high: the price for it along with 4 ledges and fireproof glue is about 6 000 rubles. I had to find other options.
Option 2 – refractory fireclay bricks. Usually everywhere shops sell heavy fireclay bricks. This type of brick is used to lay fireplaces and other chimneys. For your kiln it is better to use light fireclay bricks (ShL (ШЛ) brand, for example, ShL 0,4). In Togliatti and near it for some reasons nobody sells such bricks. The closest place to buy it is Samara. I didn’t have any desire to go to Samara (too far and expensive)…
Eventually I found some bricks in my friend’s company. (By the way, it is a very good company “Technopark”; it produces all kinds of steel construction.)

The bricks were used before but I have got them for free. You can buy new light fireclay bricks for 30 rubles per piece.
To couple bricks use heat-setting mortar that match the brick brand. There are easier options. For example, firestone or ready-made fireproof masonry admixture.

You can find this admixture in the shops which sell fireplaces or refractory bricks. And to attach the brick to a metal sheet add cement (not more than 30%) to the admixture.

Let’s start laying bricks. Lay bricks tight to each other. Open joints should be not more than 5 mm. To achieve that file some bricks until they reach the needed size. If you found used bricks as I did file edges on each of them to make them smooth and even.
First lay the bottom of the kiln. Add water to a fireproof admixture, stir it. Make a different mixture with cement for the outer layer. Before laying bricks soak them in water; otherwise the mixture will dry on bricks very fast.

Now let’s build walls. Between bricks and the body lay basaltic fiber and a metal sheet. (If you lay bricks flat and not on end you can do without basaltic fiber and a metal sheet).

The top will take longer time: closer bricks are pitched a little bit up; lay blocks like a trapezium in the middle.
Lay the door with bricks as well; cut the quarter around the perimeter to form an offset that will enter the kiln’s window.
Now you can weld the door hinges and fir our door. It is important to make the joint between the bricks on the door and the body as small as possible.

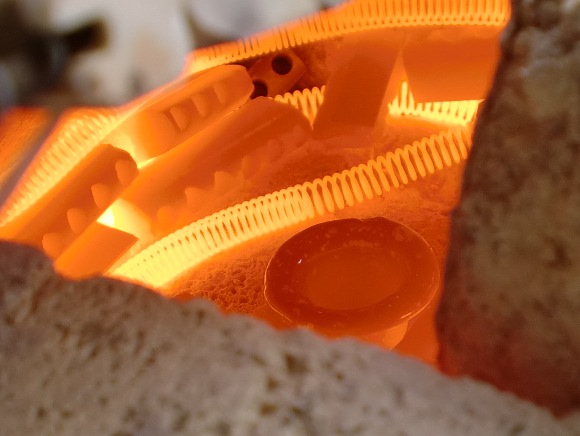
When laying is done and bricks are dry you can start the next stage. Now you need to form channels to lay heating components. In our case these components will be coils from nichrome or kanthal wire 1-2 mm in diameter. The diameter of the wire spiral is about 6-7 mm. The thickness and depth of the channels should be also 6-7 mm.

When heated the wire of the heating components is enlarged, and wire spirals can come out from the channels, so you need to fix them. In the picture below it is shown how you can place the wire spirals: 1 – the wire spirals is fixed with the help of small pieces of wire; 2 – in the channel at an angle; 3 – in the channel a bit nosed; 4 – on the mullite silica pipe.

Heaters can be positioned on the walls and at the bottom of the furnace.
You can find ready-made wire spirals (e.g. at the market) or strand these spirals from nichrome or fechral wire. Spiral turns should not touch each other.
For each of our spirals we took 14 meters of kanthal wire 1 mm in diameter. The formula for calculating the heater:
L=SR/ρ
L — wire length (m);
S — wire section (mm2);
R — wire resistance (Om);
ρ — resistivity (for nichrome ρ=1.0÷1.2 Om·mm2/m; for kanthal 1,4 Om·mm2/m).
Foк the kiln with capacity 10-50 liters we need to have 70-100 W for each liter, for the kiln with capacity 100-500 liters — 50-70 W. So we need to have 2000-3000W.
S = πD2/4
D=1 mm (diameter)
S = 3,14*1/4=0,79 mm2
I = P/U
P=2000W, U=220V
I = 2000/220 = 9,1A
R = U/I
R=220/9,1=24,1 Om
L = 0,79*24,1/1,4 = 13,6м
Let’s make two circuits of the spirals so we can adjust the temperature with a switch like the one on a stove.

Lay the ends of the wire upwards.

Install ceramic sheet from the stove burner on top on the outside and fasten the ends of the wire with bolts.

That’s the switch we will need: 2 contacts on one side and 3 on the other.

Fix the switch in such a way that the protruding bolt would come out to the front panel. Connect wires. “Phase-neutral” suits these two contacts.

Connect wires connected to our sheet to other three contacts. One of the wires (blue in the picture) closes two end contacts on the sheet.

As the result it should turn out like this: on the 1st “speed” the circuit of the spirals are connected sequentially – it is the lowest temperature.

On the 2nd “speed” one of the circuits is connected – it is a higher temperature. It is important here to make sure that the circuit laid on the bottom would be connected so the articles on the lowest level would be heated too.

On the 3rd “speed” both circuits are connected parallely – it is the highest temperature.
This is it. Now you need to dry the kiln very well. Put it in a warm place (by the radiator or in the sun), and forget about it for a month or better two. After that you will need to dry the kiln completely: turn it on the 1st speed for several hours. When steam stops, the kiln is dry. You can start ceramic burning.


Ideally plug such kiln to an enhanced socket (as the one for the electric stove). Or carry out a thick cable from the junction box. Also it would be good to set up another automatic circuit breaker.
And the last thing: don’t forget to be very careful with such homemade electric kiln especially with open spirals. Any misstep can lead to very sad consequences. If you are not good at electrical engineering consult a professional. On any account don’t touch the spirals when they are working. To secure yourself and your family set up a limit switch (when doors are open the kiln is turned off). And grounding is also very important for safety.
So the kiln is ready working, we can go to get clay.
Tags: Kiln Categories: Lessons


Thank you..
Just shows me there is no difference between Russian and American craftsman,,,,except it looks like you did a better job then I think I would have done.
I have been thinking of building a heat treat furnace myself and the use of the washing machine case is pure genius!
If you can get onto eBay they have PID temperature controllers with the thermocouple that go up to 1600C for under 35 USD. Just add a SS relay and you are in business.
Great build as is in any case.
Hope to see more things from you….Stay in touch Tovarishch.
(Im at werw4power@gmail.com)
Thank you, Steve!
Nice build! Featured in our HomemadeTools.net newsletter:
http://mailchi.mp/buildthreads/vise-stop-hand-turning-rest-router-plate-alignment-tool-342693
Very Good
do not use ”galvanized””
metal for the body. I think it give off toxic gasses.
You are right, it is better to use a stainless steel. But usually they put an vent system over the kiln, so that all the harmful substances must go away.
Hi, I’m Arezoo from Latvia. How can I order one of this handmade kilns? and How much is the price?
this helped me alot.am in africa malawi ,i wish to build my own kiln two then i need supplier of the element wire,refractories and other materials ..please link me on this email kasabitiblessings@gmail.com